Quickstart
Send Your First Event in Minutes
The fastest path to seeing Meshes work end to end is a small product event route: workspace, connection, rule, event, and delivery.
Validate the whole flow directly in the dashboard first, then wire your app to Meshes once the route is working.
The quickstart flow covers:
- Creating or choosing a workspace
- Connecting a destination (webhook)
- Defining a rule
- Sending your first event from the UI or code
- Verifying delivery in the UI
Fastest path: you can send a test event directly in the UI without writing code or grabbing a publishable key first.
Need to manage workspaces, connections, or rules programmatically? Use the private management API, which requires a server-side machine JWT (never in browser code). See: API Documentation and Authentication.
1. Create or Choose a Workspace
In the Meshes dashboard:
- Create a new workspace, or reuse an existing dev workspace
- Give it a name like
Acme DevorDemo Workspace
If you want to send events from code after validating the flow in the UI, you can find the workspace publishable key later in Workspace Settings.
2. Connect a Destination (Webhook)
For this quickstart, use a simple webhook so you can see payloads immediately.
- Create or use an existing HTTP endpoint that accepts
POSTrequests- While prototyping, a tool like
webhook.siteworks well
- While prototyping, a tool like
- In the Meshes dashboard, go to Connections → New Connection
- Choose Webhook / HTTP
- Enter:
- Name:
Demo Webhook - URL: your webhook URL
- Name:
- Save the connection
You now have a destination Meshes can send events to.
3. Define a Rule
Create a rule:
- Go to Rules → New Rule
- Set Event Type to
contact.created - Select your
Demo Webhookconnection - Leave the payload mapping as pass-through for now, or map fields if you want
- Save the rule and ensure it is enabled
At this point, any contact.created event in this workspace can be routed to your webhook.
4. Send Your First Event
Option A: Send a Test Event in the UI
This is the fastest way to validate the whole flow.
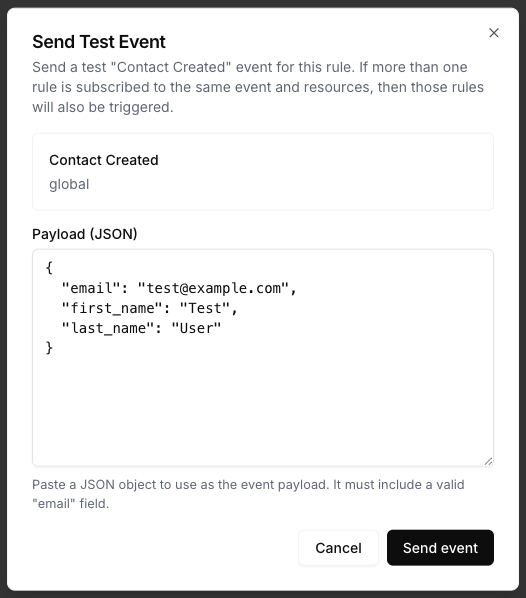
- Open the rule you just created
- Click Send Test Event
- Paste a payload like this:
{
  "email": "jane@example.com",
  "first_name": "Jane",
  "last_name": "Doe",
  "tier": "pro",
  "source": "marketing-site"
}
- Click Send Event
Meshes will create the event, evaluate the rule, and deliver it to your webhook without you needing to wire code first.
Option B: Send an Event with curl
If you want to test the real ingestion path from code, use a workspace publishable key.
This quickstart uses public event ingestion with a workspace publishable key (
X-Meshes-Publishable-Key). Publishable keys are intended for client-side use and only work with event ingestion endpoints.
Replace placeholders with your real values:
WORKSPACE_PUBLISHABLE_KEY– your workspace publishable key from Workspace Settings
curl -X POST https://events.meshes.io/api/v1/events \
  -H "X-Meshes-Publishable-Key: WORKSPACE_PUBLISHABLE_KEY" \
  -H "Content-Type: application/json" \
  -d '{
    "event": "contact.created",
    "payload": {
      "id": "lead_123",
      "email": "jane@example.com",
      "first_name": "Jane",
      "last_name": "Doe",
      "source": "marketing-site",
      "tier": "pro"
    }
  }'
You should receive a 2xx response indicating the event has been accepted for processing.
Option C: Send an Event with JavaScript / TypeScript
Using the Meshes events client:
import { MeshesEventsClient } from '@mesheshq/events';

const meshesClient = new MeshesEventsClient(
  `${process.env.MESHES_WORKSPACE_PUBLISHABLE_KEY}`,
);

async function sendContactCreated() {
  await meshesClient.emit({
    event: 'contact.created',
    payload: {
      email: 'jane@example.com',
      first_name: 'Jane',
      last_name: 'Doe',
      tier: 'pro',
      source: 'marketing-site',
    },
  });

  console.log('Event accepted by Meshes');
}

sendContactCreated().catch(console.error);
Option D: Send from a Backend Service
If you are emitting events from a secure backend, you can authenticate using a machine JWT instead:
5. Verify Delivery in the UI
- Open your workspace in the Meshes dashboard
- Navigate to Events
- Find the
contact.createdevent you just sent - Inspect:
- Overall event status
- Per-destination status for
Demo Webhook - Any retries, failures, or error messages
If you used a webhook test service, you should also see the incoming HTTP request, including the payload Meshes sent.
Next Steps
Once you have validated the flow:
- Swap the demo webhook for a real destination like HubSpot, Salesforce, or Mailchimp
- Add additional destinations to see fan-out routing
- Introduce conditions so different events or payloads go to different destinations
- Move from Send Test Event in the UI to event emission from your app using a publishable key or server-side JWT
- Create separate workspaces for dev, staging, and production
You now have the basic Meshes flow working:
workspace → connection → rule → event → delivery
Learn More
- Publishable Keys: client-safe keys for event ingestion
- Send Events: emit a single event from code
- Bulk Event Ingestion: emit up to 100 events per request
- API Documentation: private management APIs with server-side JWT auth